June 17 2024
first person shooters are violent
The sequel to my whack-a-mole idea.
Process
I’m pretty sure that the more I think “this animation is for a very specific person”, the more boosts and favorites it actually gets.
This is unquestionably my most “3D” animation thus far. Although technically whack-a-mole was 3D, it’s 2D planes in an orthographic camera, so it’s effectively 2D. But this has major 3D camera movement, models, and 3D animation.
Walking movement
This was my first exploration into nonlinear animation. The basic idea is that you can create “keyframe sequences”, and you can insert them as strips and edit them like you would a video editor. This seems very hard to imagine but it’s extremely effective at layering and reusing sequences of animations.
Here I’ve used it to split the camera movement into two separate layers: a bobbing motion where the keyframes only lay down the first cycle and the Cycles modifier is used to repeat it, and the actual movement walking forward, which is completely smooth. Blender didn’t quite have a good process for layered animation, so animating the bobbing part by itself was a little funny. But I got very effective results from it.
A similar process is used for the gun.
dragn
Turns out that drawing things facing the camera and in perspective is really hard. It’s a little weird but it’s good enough.
One of my personal principles of character design is I make my characters look as simple as possible because it makes them more practical for hand-drawn animation. Among other things, this means that my dragons don’t have scales, because they’re a lot of effort to make consistent across multiple frames.
Though I do try to branch out and try new details for each of my characters, and I knew I wouldn’t have much movement for them, so I decided to try putting on scales. The moment I went to animate, I instantly regretted that decision. Even that simple animation is burdened by the presence of scales because any neck movement means minute adjustments to the scales have to be made to every frame.
Annoyances with grease pencil
All the grease pencil effects are done with a line art modifier, which I’ve used in past projects. However one annoying thing is that you can’t make the line thicknesses appear to be all the same size regardless of how far away an object is. To do this practically I had to split everything up into collections. Furthermore, objects between collections can cause weird issues in the line art so I had to go the further step of rendering everything as a bunch of separate layers. And while that introduced further artifacts that were left in the final result, at least the line thickness consistency is better.
The gun model
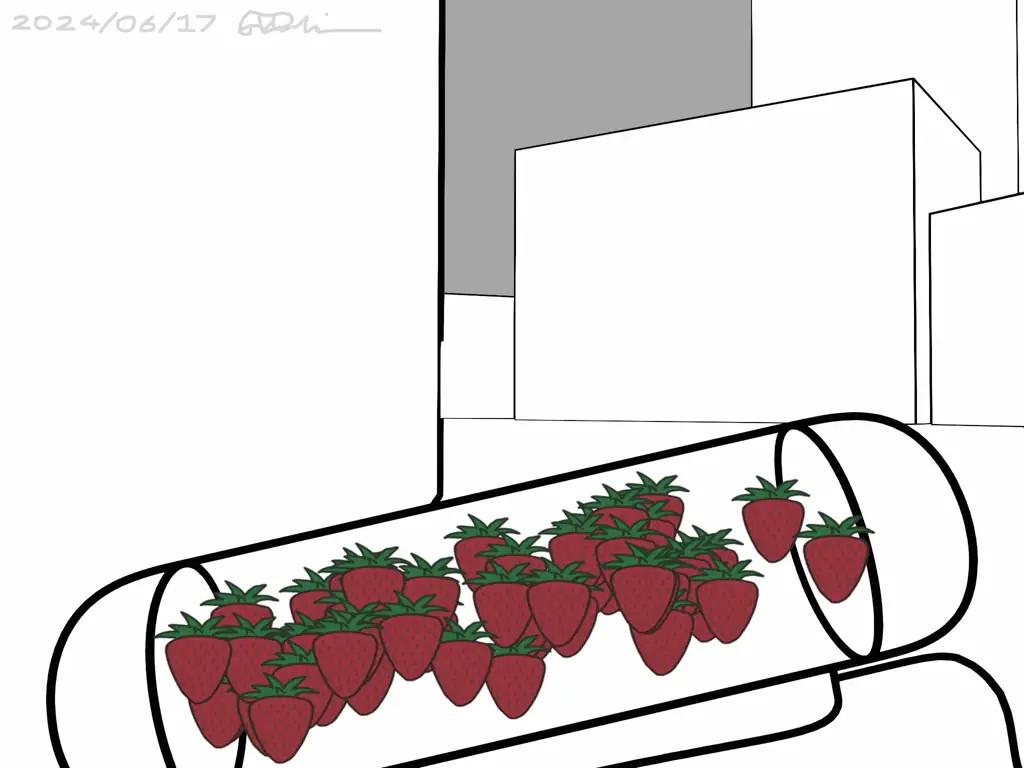
It can be tricky to build models specifically for the line art modifier because it really likes sharp corners and angles, but not smooth surfaces. Furthermore I knew I wanted a transparent looking “top magazine” so the viewer can see the strawberries. I ended up splitting the gun itself into a number of different layers to make happen.
The strawberries are also on a separate layer. I drew a strawberry in Krita, imported it as a plane into Blender, then used geometry nodes to generate a whole bunch of them in the magazine and work out vector math to have them always point towards the camera (acting as billboards).
Due to the very weird way the animation was set up, and my constant re-rendering of layers in order to fix issues, there’s an error where the animation of the wireframe of the magazine is off-sync with the rest of the gun. But I left it in there. No one’s going to care.
Sometimes you get a lucky solution
Due to the way mattes are handled between render passes and grease pencils, I couldn’t depth composite the dragon with the wall obscuring them on the initial walk. I was thinking that I’d have to do all sorts of mask tracking to slowly reveal the dragon as the player walks alongside the wall. But upon playing back all the layers I discovered that at the part of the video where the wall starts to uncover the dragon, the movement of the gun actually obscures most of that! So all I needed to do was only show the dragon layer as the gun starts to move into position!
Retiming and compositing
I had a number of really tricky timing-related issues to handle, especially with the shooting. I want the trajectory of the strawberry to last long enough to make it clear to the viewer that the thing being shot was a strawberry. But also short enough that it would seem on the more realistic side. I also wanted enough space between the shots to have the dragon eat the strawberry, but short enough that it’s more on the rapid fire side.
With all that criteria, and with the way I had set up the animation, I ended up just rendering one shot and then the smile. I took that into a second Blender file to add the multiple shots, adjust pacing, composite all the layers, add the health indicator, and add the signature.
Videos
Behind-the-scenes videos will be added in a future update.